Sick deTec4 Safety light curtain
|
The sick deTec4 safety light curtain is used to secure the working area of the robot. This device ensures that the robot will stop if a person or object enters the working area. This document applies when troubleshooting the system in case it does not work properly. |
|
This is a safety device. To be used by trained and authorized personnel only. |
1. Use following tools
|
|

2. Description
2.1. Indications
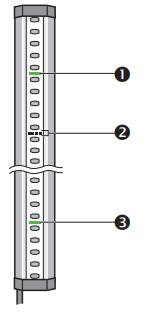
2.1.1. Sender
|
|
1 Red/yellow/green: Field indicator, shows the status of the protective field and additional information about the status display 2 Laser alignment aid 3 Red/yellow/green: Status indicator |
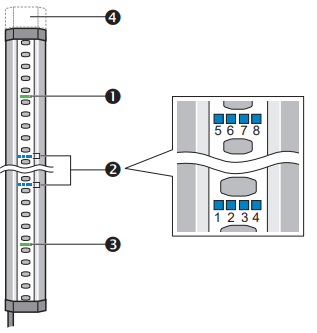
2.1.2. Receiver
|
|
1 Red/yellow/green: Field indicator, shows the status of the protective field and additional information about the status display 2 Blue/red/yellow/white: Diagnostics lights 3 Red/green: OSSD status (secure output signal switching devices give the status of the output) 4 Red/yellow/green: End cap with integrated LED (optional) |
| See SICK manual chapter 9.4 Operation - LEDs or 11.3 Troubleshooting - Diagnostic LEDs for more information |
2.2. First Diagnostics
Make sure the screens of both sender and reciever are clean:
-
Use a clean and soft brush to remove dust from the front screen
-
Wipe the front screen with a clean and damp cloth
-
Do not use aggressive or abrasive cleaning agents!
While cleaning the sender and reciever, make sure to not affect their positions as this could break their alignment.
Check if there are any obstructions between the sender and reciever. Obstacles are not always clearly visible. Some things that often are overlooked:
-
Cables or air tubes
-
Clouds of dense coolant-mist that seem transparent to the eye
-
Reflectors outside the safety zones
-
Insects or animals
Check the beam coding
In normal working conditions, the following indicator lights should be illuminated:
Sender:
-
If the sender and receiver are connected to each other by a cable, the LEDs on the sender indicate the same status as the LEDs on the receiver during normal operation. The STATE LED on the sender adopts the status of the OSSD LED on the receiver. If the sender and receiver are not connected with each other, the STATE LED on the sender lights up yellow when the sender is in operation and no faults are present.
Receiver:
-
OSSD/Field led: green (system enabled, this means that the light curtain isn’t interrupted.)Be aware: this doesn’t mean the robot is ready to start, it is possible that the light screen still has to be reset using the blinking yellow reset button near the IPC.
2.3. Diagnostic lights
|
|
1…4 Blue: Indication of the alignment quality. If only one diagnostic LED lights up, the alignment is insufficient. If all 4 diagnostic LED’s light up, the alignment is excellent. 5, 6 Blue: The topmost beam (far from system plug) is synchronized. 7, 8 Blue: The bottommost beam (near system plug) is synchronize. 1…8 Red: A red illuminated diagnostic LED signals the function at which an error has occurred. 1…8 Yellow: A yellow illuminated diagnostic LED signals which function is affected. |
| SICK manual |
See SICK manual chapter 3.2.19 Product description - Product characteristics - Status indicators for more information
3. How to get further help
Do not hesitate to contact us when you need additional support beyond the documents provided in the RoboJob Service Knowledge Base.
You may contact the RoboJob Service department using following means:
-
Help Center: service.robojob.eu
-
Email: service@robojob.eu
-
Phone: +32 15 70 89 70
We kindly ask you to provide us the following information:
-
Serial number xx-xx-xxx
-
Description of the fault or defective part
-
Exact error code or message
-
What did the robot do
-
What was the robot supposed to do
-
Pictures or videos
You can send this information to us via email.To send large files you may make use of a file transfer service like WeTransfer: robojob.wetransfer.com.
An automatic confirmation will be sent upon receipt of your mail.