Metal Work One: All-in-One Air Prep Unit
|
The metalwork unit is an all-in-one conditioning unit. In this document the different functions are explained. The setting of the pressure switch is also explained.This document applies in case of an air pressure alarm or when something is wrong with the air pressure. |
|
To be used by trained and authorized personnel only |
1. Use following tools
|
|
2. Description
2.1. Overview
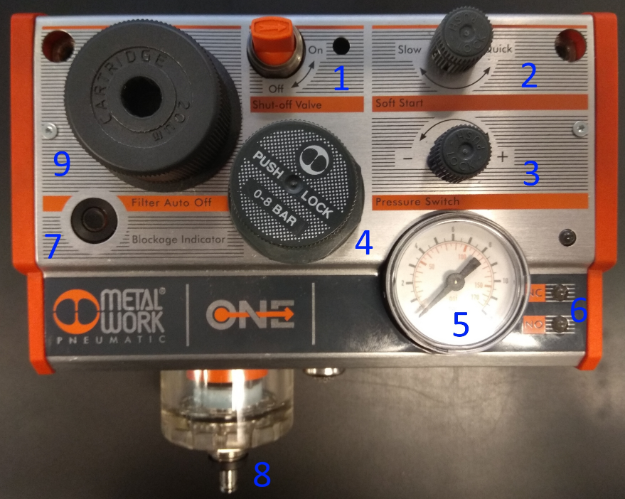
1 Manual valve: When the valve is in the On position, the air supply is enabled. When the valve is in the Off position, the air supply is shut off and the line downstream is depressurized.
2 Soft start valve: sets the speed with wich the system is pressurized. This can be set all the way to quick for RoboJob systems. Pull on the knob to release it, push it in to lock it again.
3 Pressure switch: Used to monitor pressure in pneumatic systems by providing an output when a set pressure is reached.
4 Pressure regulator: The desired pressure can be set here. Pull on the knob to release it, push it in to lock it again.
5 Manometer: The current pressure is indicated here.
6 LED’s: the LED labeled NO (yellow) is on when the pressure is higher than the pressure set with the pressure switch. In normal working conditions, the pressure is higher than the Pressure Switch setpoint and therefore the NO LED should always be on.
7 Clogged filter signal: If the internal filter is too clogged up and causes an excessive drop in pressure, the indicator will potrude from the body by a few millimetres.
8 Condensate drain: the moisture seperated from the air supply is collected here. The condensate is drained out automatically by a float valve when the level reaches a certain point.
9 Filter: The internal filter is located behind this plug, it can be unscrewed to replace the filter.
2.2. Setting the pressure at which the pressure switch operates
-
Pull the Pressure Switch
-
Turn the Pressure Switch knob towards '-' as far as it will go (you’ll hear and feel some 'clicks' when the end of it’s travel is reached).
-
Pull the Pressure Regulator knob and set the Pressure Regulator to the requested alarm value (lower than the normal operating pressure, the current pressure reading can be found on the manometer). The NO LED should be illuminated at this point.
-
Turn the Pressure Switch knob toward '+' untill the NO LED turns off.
-
Press the Pressure Switch knob to lock it.
-
Return the Pressure Regulator knob to it’s normal setpoint and press the knob to lock it. The NO led should now be illuminated again.
| Manual download |
3. How to get further help
Do not hesitate to contact us when you need additional support beyond the documents provided in the RoboJob Service Knowledge Base.
You may contact the RoboJob Service department using following means:
-
Help Center: service.robojob.eu
-
Email: service@robojob.eu
-
Phone: +32 15 70 89 70
We kindly ask you to provide us the following information:
-
Serial number xx-xx-xxx
-
Description of the fault or defective part
-
Exact error code or message
-
What did the robot do
-
What was the robot supposed to do
-
Pictures or videos
You can send this information to us via email.To send large files you may make use of a file transfer service like WeTransfer: robojob.wetransfer.com.
An automatic confirmation will be sent upon receipt of your mail.